For anyone living with diabetes, pre-diabetes, or at high risk of the condition, blood sugar testing at home is not a luxury — it is a fundamental part of staying healthy. Regular self-monitoring tells you how your food, exercise, sleep, and medication are affecting your glucose levels in real time. Furthermore, it puts you in control, giving you and your doctor the data needed to make smarter, faster decisions about your care.
At MCR Diabetes & Eye Care Centre, Kannur, our diabetologist guides every patient through the process of accurate home blood sugar monitoring. This complete guide covers the step-by-step method, normal sugar level ranges, glucometer versus CGM, when to test, common mistakes, and warning signs that require immediate medical attention.
Why Testing Blood Sugar at Home Matters
Laboratory blood tests are essential for diagnosis and periodic review; however, they only capture a single snapshot. However, they only capture a single snapshot of your glucose level at one moment in time. Home testing, by contrast, provides a dynamic picture of how your blood sugar fluctuates throughout the day — before and after meals, during exercise, and at night.
Benefits of Regular Home Blood Sugar Monitoring
Regular self-monitoring empowers people with diabetes in several important ways. First, it helps you understand which foods cause blood sugar spikes specific to your body. Second, it allows your doctor to assess whether your current medication is working effectively. Third, it enables early detection of both high blood sugar (hyperglycaemia) and dangerously low blood sugar (hypoglycaemia), both of which require prompt action. As a result, people who monitor consistently tend to have better HbA1c results and fewer long-term complications.
Key fact: According to the American Diabetes Association, self-monitoring of blood glucose (SMBG) is a cornerstone of effective diabetes management, particularly for people on insulin. Moreover, even people managing diabetes through diet alone benefit from periodic monitoring to confirm their approach is working.
Who Should Test Blood Sugar at Home?
Home blood sugar testing is, therefore, recommended for several groups. People diagnosed with Type 1 or Type 2 diabetes clearly benefit from it, as do those who are pregnant and managing gestational diabetes. Additionally, people with pre-diabetes can benefit enormously from monitoring — because catching rising glucose early gives the best chance of reversing the trend before diabetes develops fully. Finally, people who are at high risk — due to family history, obesity, or a sedentary lifestyle — may also benefit from periodic home testing to track their metabolic health proactively.
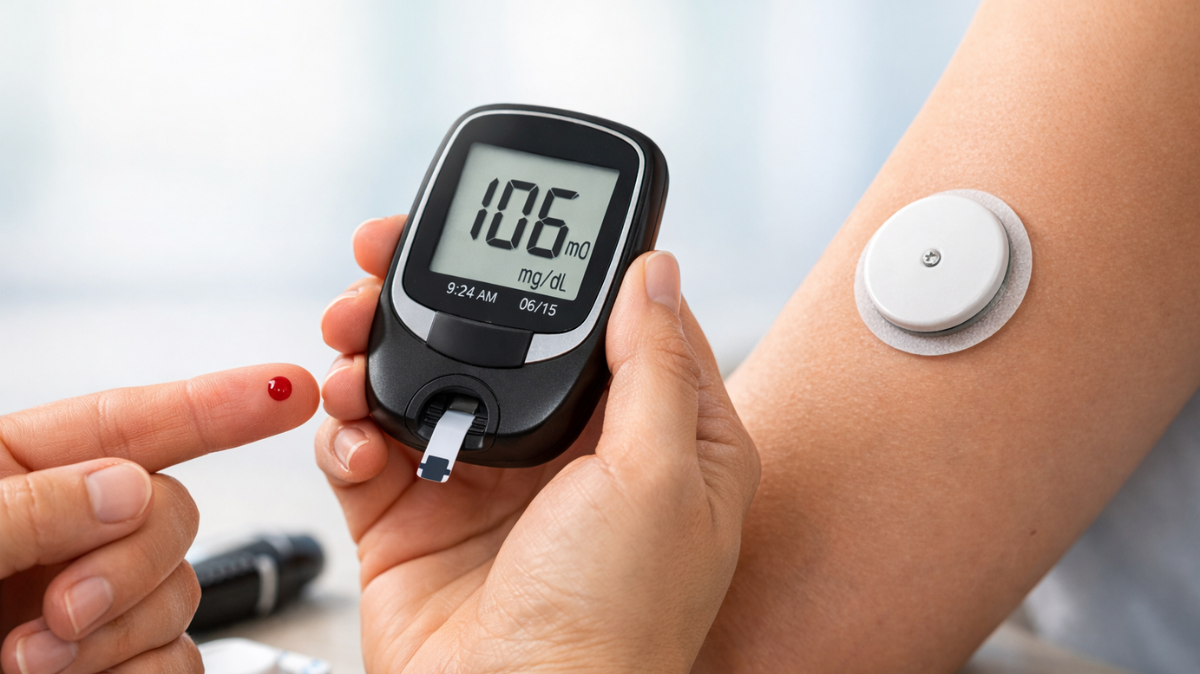
Types of Home Blood Sugar Testing Devices
Two main types of devices are available for home blood sugar testing in India today: the traditional glucometer and the newer Continuous Glucose Monitor (CGM). Both are effective; nevertheless, they suit different people and different monitoring needs.
Glucometer (Blood Glucose Monitor)
A glucometer is a small handheld device that measures blood glucose from a single drop of blood obtained by pricking your fingertip with a lancet. Results appear within 5 seconds. Glucometers are widely available across India, typically cost between ₹500 and ₹3,000, and have affordable test strip refills. As a result, they are the most practical option for most people managing diabetes at home.
Continuous Glucose Monitor (CGM)
A CGM is a small sensor worn on the skin — usually the arm or abdomen — that measures glucose levels in the fluid beneath the skin every few minutes. Instead of a single reading, CGM provides a continuous stream of data, including trend arrows showing whether glucose is rising or falling. Popular CGM options available in India include FreeStyle Libre, BeatO CGM, and LinX CGM. Although CGMs cost significantly more than glucometers, they eliminate the need for repeated finger pricks than glucometers, they eliminate the need for repeated finger pricks and provide much richer data for diabetes management.
Glucometer
- Cost: ₹500 – ₹3,000
- Single reading per test
- Requires finger prick each time
- Result in 5 seconds
- Best for: most people with diabetes
- Strip cost: ₹8–20 per strip
- Widely available at pharmacies
- No subscription or app needed
CGM Device
- Cost: ₹3,000 – ₹8,000 per sensor
- Continuous readings (every 1–5 min)
- No finger pricks required
- Trend data: rising, stable, falling
- Best for: insulin users, frequent fluctuations
- Sensor lasts 10–15 days
- Smartphone app integration
- Alarms for high / low glucose
Both devices are valuable tools. The right choice depends on your type of diabetes, budget, monitoring frequency, and lifestyle. Our diabetology team at MCR can help you choose the device that best suits your individual needs.
How to Test Blood Sugar at Home: Step-by-Step Guide
Indeed, performing a blood sugar test correctly is just as important as testing frequently. Inaccurate technique can lead to misleading results and poor clinical decisions. Follow these six steps carefully every time you test.
Step-by-Step Glucometer Testing Method
Completing the Test: Steps 4 to 6
Important tip: Never share a glucometer or lancet with anyone else, even a family member. Sharing lancing devices carries a risk of transmitting blood-borne infections. Each person should have their own dedicated device.
Normal Blood Sugar Levels at Home: What Your Reading Means
Furthermore, understanding what your blood sugar reading actually means is just as important as the act of testing itself. Different readings are interpreted differently depending on when you tested — specifically, whether you fasted beforehand or tested after a meal.
Blood Sugar Reference Ranges for Adults (mg/dL)
| Test Type | Normal | Pre-diabetes | Diabetes |
|---|---|---|---|
| Fasting (8–10 hrs after last meal) | 70 – 99 | 100 – 125 | 126 or above |
| Post-meal (2 hours after eating) | Below 140 | 140 – 199 | 200 or above |
| Random (any time of day) | Below 140 | — | 200 or above with symptoms |
| Pre-sleep (before bedtime) | 100 – 140 | — | Discuss target with your doctor |
Note: These are general reference ranges for most non-pregnant adults. Your personal target range may differ depending on your age, duration of diabetes, medications, and overall health. Consequently, always confirm your individual targets with your diabetologist at MCR.
What Is HbA1c and How Is It Different?
Home glucometer readings reflect your blood sugar at a single moment. In contrast, the HbA1c test — performed at a laboratory — reflects your average blood sugar over the past 2–3 months. An HbA1c below 5.7% is normal; 5.7–6.4% indicates pre-diabetes; 6.5% or above confirms diabetes. Both types of testing are important: daily home readings help you manage day-to-day control, while HbA1c gives you and your doctor a broader view of long-term trends. Learn more about our comprehensive diagnostics and HbA1c testing services at MCR.
When to Test Your Blood Sugar at Home
Similarly, testing at the right time is just as important as testing frequently. Different testing times reveal different aspects of your glucose control. In particular, your doctor will advise a testing schedule based on your medications and management goals.
Recommended Testing Times for People with Diabetes
How Often Should You Test?
Notably, testing frequency depends on your type of diabetes and treatment plan. People on insulin generally need to test 4–6 times daily. Those on oral medication may test once or twice daily. People managing diabetes through diet alone can often test 2–3 times per week. However, the ideal schedule is always individual — therefore, your diabetologist should advise you based on your specific situation and goals.
Tips for Accurate Blood Sugar Readings at Home
Even a high-quality glucometer can produce inaccurate results if used incorrectly. Several factors are known to affect the reliability of home blood sugar readings. Fortunately, most of these are easy to avoid once you are aware of them.
Common Factors That Affect Glucometer Accuracy
Warning Signs: When to Act Immediately
Home blood sugar testing is most valuable when it helps you act quickly on abnormal readings. Both very high and very low blood sugar levels are, therefore, medical emergencies that require prompt response. Therefore, every person who monitors at home should know the warning signs of each.
Recognising Hyperglycaemia and Hypoglycaemia
- Excessive thirst and frequent urination
- Blurred vision and headache
- Extreme fatigue and weakness
- Fruity or acetone smell on breath
- Nausea or vomiting
- Reading above 300 mg/dL — seek care immediately
- Sudden shakiness or trembling
- Cold sweating and pale skin
- Rapid heartbeat or palpitations
- Confusion or difficulty concentrating
- Dizziness or near-fainting
- Below 54 mg/dL — treat immediately with 15g glucose
Emergency rule (15-15 rule for low blood sugar): If your reading is below 70 mg/dL, consume 15 grams of fast-acting glucose — 4 glucose tablets, 150 ml fruit juice, or 3 teaspoons of sugar dissolved in water. Retest after 15 minutes. If still below 70 mg/dL, repeat. If unconscious, do not give anything by mouth — call emergency services immediately.
When to Contact Your Doctor About Home Readings
Besides emergencies, certain patterns in your home readings should prompt a call or visit to your diabetologist. These include consistently high fasting readings above 150 mg/dL, post-meal readings persistently above 200 mg/dL, more than two hypoglycaemic episodes in a week, unexplained large swings between readings, or any reading above 300 mg/dL without an obvious cause.
Home Testing and Your Diabetes Diet: Working Together
One of the most valuable uses of home blood sugar testing is, in fact, understanding how specific foods affect your individual glucose response. Testing 2 hours after meals allows you to identify which foods cause the sharpest spikes in your glucose levels — and consequently, which ones to adjust or avoid.
For instance, you might find that white rice raises your blood sugar significantly more than an equal portion of jowar roti, or that adding dal to your meal reduces the post-meal spike. Furthermore, this information helps your diabetologist refine your diabetes diet plan based on your actual responses rather than general guidelines alone. Combined with a structured Indian diabetes diet chart, regular home testing forms a powerful two-pronged strategy for blood sugar control.
Tracking Your Readings Effectively
Consequently, a simple logbook or glucose tracking app is essential for making home testing truly useful. Record every reading with the date, time, testing context (fasting, post-meal, or random), and any relevant notes such as what you ate, whether you exercised, or how you felt. Sharing this logbook with your doctor at every appointment allows for far more precise treatment adjustments than any single clinic reading could provide.
Get a Personalised Blood Sugar Monitoring Plan in Kannur
Not sure how often to test, which device to use, or what your readings mean? Our specialist diabetologist at MCR Diabetes & Eye Care, Kannur, will review your home readings, guide your device choice, and create a personalised monitoring plan that fits your lifestyle and treatment.
Frequently Asked Questions: Blood Sugar Test at Home
Below are answers to the questions our patients ask most frequently about home blood sugar monitoring. If your question is not addressed here, do not hesitate to contact our team directly.
What is the normal blood sugar level at home?
How often should I test my blood sugar at home?
Which is better — glucometer or CGM for home testing?
More Questions About Home Blood Sugar Testing
Can I test blood sugar at home without a glucometer?
What time of day is best to check blood sugar at home?
How do I know if my glucometer reading is accurate?
Final Takeaway: Small Habit, Big Impact
Testing your blood sugar at home is one of the smallest daily habits that can have the largest impact on your long-term health. Specifically, regular monitoring gives you real-time feedback on how your food choices, physical activity, sleep, and medication are working — and it gives your doctor the data needed to fine-tune your treatment with precision.
Whether you ultimately choose a glucometer for its affordability or a CGM for its convenience, the most important thing is consistency. Test regularly, record your results, and share them with your diabetologist at every review appointment. Moreover, if you notice a pattern of readings outside your target range, act on it promptly — do not wait for your next scheduled visit.
At MCR Diabetes & Eye Care, Kannur, we support every patient in building a home monitoring routine that is simple, sustainable, and clinically meaningful. Whether you are newly diagnosed, adjusting medication, or simply wanting better insight into your glucose patterns, our team is here to guide you. Additionally, if you want to understand how diet affects your readings in more detail, our guide to the Indian diabetes diet chart is an excellent next step. To learn more about what causes diabetes and whether it can be managed without medication, our blog on diabetes remission and reversal provides clear, evidence-based answers.